Looking for a "Turnkey" solution?
If technical steps seem too difficult, choose the Managed Pro plan. You won't have to worry about configuring hosting, SSL, email, domains, or files. We take care of everything.
Just choose "Managed Pro" indicating the domain name you want.
How to put your site online (Download)
If you downloaded the ZIP package, follow these 4 steps.
Download ZIP
From checkout or dashboard, download the sito_completo.zip file. Save it to your desktop.
Extract Files
Right-click on the ZIP -> "Extract all". You will find the index.html file and images.
Hosting & Domain
We recommend Serverplan for maximum speed and support:
Upload Online
Use your hosting's File Manager or FileZilla to upload files to the public_html folder.
Why choose 123Web.ai?
Not just a website, but a complete platform. Ultra-fast NVMe hosting, integrated security, and dedicated support in one package.
- NVMe Storage
- Anti-DDoS Protection
- 24/7 Support
Don't have Hosting or Domain yet?
We tested dozens of providers. Serverplan is the only one guaranteeing:
- H24 Support
- Ultra-fast NVMe Disks
- Free SSL Certificate
Quick Edit Guides
index.html file with a program like Notepad (Windows) or TextEdit (Mac).Search for the phrase you want to change and overwrite it. Save the file and re-upload it to the server.
gen_1.webp).1. Take your new photo.
2. Rename it exactly like the one you want to replace (e.g.
gen_1.webp).3. Replace the file in the folder.
setup_email.php.Upload everything online, then visit that page with your browser to connect your email in 1 minute.
See step-by-step instructions →
Frequently Asked Questions (FAQ)
├── index.html (Main File)
├── favicon.png
└── gen_1.webp
index.html (lowercase), otherwise the site won't be visible. 1. Download and extract your site ZIP.
2. Look for the file
TUTORIAL 2026.html inside the folder.3. Open it with your browser (Chrome, Safari, etc.) and follow the interactive guide.
Your email passwords are saved in a protected configuration file (
config.php) that is not accessible from outside thanks to security rules included in the package's .htaccess file. Video Tutorials
Watch our short guides to get started right away.

Tutorial: How to install the Download Plan
Tutorial: How to activate the Managed Pro Plan
Step-by-Step Guides
These guides are for those who purchased the Hosting or Download plan. If you chose the Managed PRO (Turnkey) package, you don't have to worry about anything: we take care of it all!
How to create an Email on Plesk
- Log in to Plesk: Use the link and credentials you received in the welcome email.
- Mail Section: In the left menu, click on the "Mail" item.
- Create Address: Click the blue "Create Email Address" button.
- Details: Enter your desired name (e.g., info), choose a secure password, and click "OK" at the bottom of the page.
How to set up Email on Smartphone or PC
Use these universal settings for Outlook, Gmail, iPhone, or Mac Mail:
- Username: Your full email (e.g., info@yourdomain.com)
- Mail Server (In/Out): mail.yourdomain.com
- IMAP Port: 993 (SSL/TLS)
- SMTP Port: 465 (SSL/TLS)
How to install a Free SSL Certificate
- Websites & Domains: In the main Plesk dashboard, find your domain.
- SSL/TLS Certificates: Click on the "SSL/TLS Certificates" icon.
- Let's Encrypt: Under "Install a free basic certificate provided by Let's Encrypt", click "Install" (or "Get it free").
- External DNS & ACME Code: If your domain is managed externally (e.g., Namecheap, GoDaddy), Let's Encrypt will show you a TXT Code (e.g.,
_acme-challenge.yourdomain.com).Important: You must copy this code into your registrar's DNS panel and wait a few minutes before clicking "Reload" in Plesk. - Confirm: Once the code is verified, click the blue "Install" button to activate it. You'll have the green padlock in seconds.
ACME Challenge Screen Example (click to enlarge):
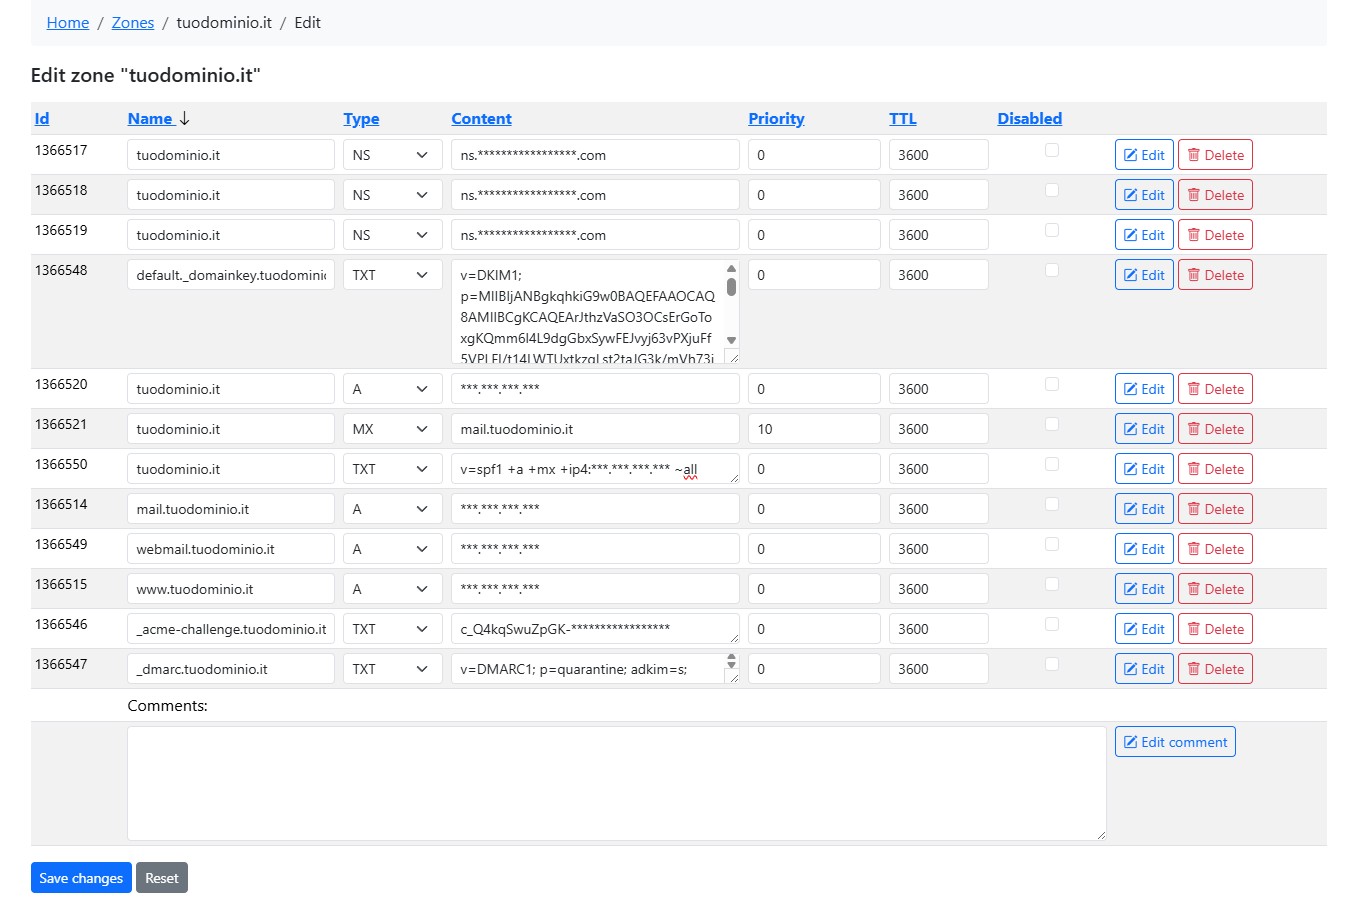
DNS Configuration (SPF, DKIM, DMARC)
These records help prevent your emails from ending up in SPAM. They must be added to your domain management panel (DNS) provided by your registrar (Namecheap, GoDaddy, SiteGround, etc.).
0. A Record (Website Address)
Type: A | Name/Host: @ (or empty)
yourdomain.com
Points your domain to the server. Use the IP found in Plesk.
0b. A Records (Mail, Webmail, WWW)
Type: A | Name/Host: mail, webmail, www
yourdomain.com
These are required for your email, webmail, and the "www" version of your site to work properly.
1. SPF Record (Authorization)
Type: TXT | Name/Host: @
v=spf1 +a +mx +ip4:[YOUR-PLESK-IP] ~all
This record officially declares which servers are authorized to send emails for your domain.
2. DKIM Record (Digital Signature)
Type: TXT | Name/Host: default._domainkey
In Plesk > DNS Settings, look for the record starting with v=DKIM1;... and copy it entirely as the value.
3. DMARC Record (Policeman)
Type: TXT | Name/Host: _dmarc
v=DMARC1; p=none; adkim=s; aspf=s
Tells servers to "quarantine" suspicious emails with strict alignment.